Jeffrey Gong 2016-03-03 19:44:00
Reading this document will provide the reader with an understanding of how to configure a network to host OpenStack on physical hosts. Openstack is written in Python, and most Python code acknowledges a convention over configuration approach. That means there are some reasonable defaults chosen. The Openstack community has chosen to have a very minimal number of defaults. Fuel installer goes father and has chosen enough defaults to make Openstack actually work.
This setup will work for Openstack Fuel 8 and Fuel 9.
All the host systems used in this setup had two, four core processors, 24 gigs of ram. Network connection was 100 MB switch. The install ran to completion, but the resulting stack has issues. The Fuel all in one host install and runs with a 96 GB ram host. About 20-30 Gigs of ram is consumed for paging and caching. It’s my opinion it’s not the best use of time to do a multi host install of Openstack with each node less than 64 Gigs of ram.
 |
| Network Diagram |
VLAN Network Description
- VLAN 1 – default, fuel DHCP, all eth0 from servers
- VLAN 2 – existing Home Network
- VLAN 100 – Public IP address.
- All other VLAN just magically work
- set password and enable password
- set IP address of switch to 10.20.0.254/24
- put ports 1 through 8 on VLAN 2
- put ports 9 through 32 on VLAN 1. port configured to “switchport trunk encapsulation dot1q”
- put ports 33 through 48 on VLAN 100
- save configuration
- eth0 on to VLAN 1 (switch port 9)
- eth0 on any switch port 10 through 32, defaults VLAN 1
- eth1 on any switch port 10 through 32, Not required Option
- eth2 on any switch ports 33 through 48, tagged to VLAN 100
- eth3 on any switch ports 2 through 8, IPMI and Home Network DHCP IP address for debugging
- Public, or Wide Area side connected to VLAN 2
- LAN or Private side connect to VLAN 100
- Set IP address range to 176.16.0.1/24, no DHCP
Desktop Workstation – Ubuntu host, NAT Router
- eth0 connected to Home Network. If you connect it to a VLAN 2 port, you will have to move your Ethernet wire if you choose to shutdown the switch.
- eth1 connected to a port on VLAN 1. IP Address set to 10.20.0.1/24
- Use the following commands to provide NAT translations for 10.20.0.0/24 network.
- If you want Openstack to run while your desktop is being rebooted, use another NAT router instead of your workstation. Make NAT Router 10.20.0.1, no DHCP. I would suggest that the Workstation should use 10.20.0.254/24 as an IP address in this case.
- eth1.100 127.16.0.128/24
- this is VLAN tagged. Allows access 127.16.0.0/24 for validating this subnet. IP Address not used by default by Fuel.
Below is an interface file from desktop. By connecting one Ethernet port to the Home Network, and the other for Fuel deployment, the workstation will work as expected with Ghetto Stack powered off.
# interfaces(5) file used by ifup(8) and ifdown(8)
auto lo
iface lo inet loopback

auto eth0
iface eth0 inet static
  address 192.168.0.9
  netmask 255.255.255.0
  network 192.168.0.0
  broadcast 192.168.1.255
  gateway 192.168.0.1
  dns-nameservers 192.168.0.1
  dns-nameservers 8.8.8.8

auto eth1
iface eth1 inet static
  address 10.20.0.1
  netmask 255.255.255.0
  vlan-raw-device eth1

auto eth1.100
iface eth1.100 inet static
  address 127.16.0.128
  netmask 255.255.255.0
  vlan-raw-device eth1
modprobe 8021q
apt-get install vlan
vconfig add eth1 100
ifconfig eth1 10.20.0.1 netmask 255.255.255.0
ifconfig eth1.100  127.16.0.128 netmask 255.255.255.0
# interfaces(5) file used by ifup(8) and ifdown(8)
auto lo
iface lo inet loopback

auto eth0
iface eth0 inet static
  address 10.20.0.1
  netmask 255.255.255.0
  vlan-raw-device eth0
auto eth0.2
iface eth0.2 inet static
address 192.168.0.9
netmask 255.255.255.0
network 192.168.0.0
broadcast 192.168.1.255
gateway 192.168.0.1
dns-nameservers 192.168.0.1
dns-nameservers 8.8.8.8vlan-raw-device eth0auto eth0.100 iface eth0.100 inet static address 127.16.0.128 netmask 255.255.255.0 vlan-raw-device eth0
command line alternative:
modprobe 8021q
apt-get install vlan
vconfig add eth0 2vconfig add eth0 100
ifconfig eth0 10.20.0.1 netmask 255.255.255.0
ifconfig eth0.2 192.168.0.9netmask 255.255.255.0ifconfig eth0.100 127.16.0.128 netmask 255.255.255.0
NAT 10.20.0.0/24 network on Workstationecho 1 > /proc/sys/net/ipv4/ip_forward
/sbin/iptables --flush
/sbin/iptables --table nat --flush
/sbin/iptables --delete-chain/sbin/iptables -P FORWARD ACCEPT
/sbin/iptables --table nat -A POSTROUTING -o eth0 -j MASQUERADE
 |
| Getting in to console |
sudo apt-get install cu
sudo chmod 666 /dev/ttyUSB0
sudo cu -l /dev/ttyUSB0 -s 9600
To disconnect from cu, type tilde dot
~ .
c3548#conf t
Enter configuration commands, one per line.  End with CNTL/Z.
c3548(config)#end
c3548#
wr mem
c3548#show running-config interface FastEthernet0/33
Building configuration...

Current configuration:
!
interface FastEthernet0/33
 switchport access vlan 100
end

c3548#conf t
Enter configuration commands, one per line.  End with CNTL/Z.
c3548(config)#interface FastEthernet0/33
c3548(config-if)#no switchport access vlan 100
c3548(config-if)#end
c3548#show running-config interface FastEthernet0/33
Building configuration...

Current configuration:
!
interface FastEthernet0/33
end

c3548#
c3548#conf t
Enter configuration commands, one per line.  End with CNTL/Z.
c3548config)#enable secret changeme
c3548(config)#end
line vty 0 4
 password YOURPASSWORD
 login
line vty 5 15
 password YOURPASSWORD
 login
- interface FastEthernet0/1 was used to connect to another switch. There is no need to sit in the same room with noisy fans.
interface VLAN1 is set to10.20.0.254, this is the IP address we can telnet to the switch.
interface FastEthernet0/1
 switchport trunk encapsulation dot1q
 switchport mode trunk
!
interface FastEthernet0/2
 switchport access vlan 2
!
interface FastEthernet0/3
 switchport access vlan 2
!
interface FastEthernet0/4
 switchport access vlan 2
!
interface FastEthernet0/5
 switchport access vlan 2
!
interface FastEthernet0/6
 switchport access vlan 2
!
interface FastEthernet0/7
 switchport access vlan 2
!
interface FastEthernet0/8
 switchport access vlan 2
!
interface FastEthernet0/9
 switchport trunk encapsulation dot1q
!
interface FastEthernet0/10
 switchport trunk encapsulation dot1q
!
interface FastEthernet0/11
 switchport trunk encapsulation dot1q
!
interface FastEthernet0/12
 switchport trunk encapsulation dot1q
!
interface FastEthernet0/13
 switchport trunk encapsulation dot1q
!
interface FastEthernet0/14
 switchport trunk encapsulation dot1q
!
interface FastEthernet0/15
 switchport trunk encapsulation dot1q
!
interface FastEthernet0/16
 switchport trunk encapsulation dot1q
!
interface FastEthernet0/17
 switchport trunk encapsulation dot1q
!
interface FastEthernet0/18
 switchport trunk encapsulation dot1q
!
interface FastEthernet0/19
 switchport trunk encapsulation dot1q
!
interface FastEthernet0/20
 switchport trunk encapsulation dot1q
!
interface FastEthernet0/21
 switchport trunk encapsulation dot1q
!
interface FastEthernet0/22
 switchport trunk encapsulation dot1q
!
interface FastEthernet0/23
 switchport trunk encapsulation dot1q
!
interface FastEthernet0/24
 switchport trunk encapsulation dot1q
!
interface FastEthernet0/25
 switchport trunk encapsulation dot1q
!
interface FastEthernet0/26
 switchport trunk encapsulation dot1q
!
interface FastEthernet0/27
 switchport trunk encapsulation dot1q
!
interface FastEthernet0/28
 switchport trunk encapsulation dot1q
!
interface FastEthernet0/29
 switchport trunk encapsulation dot1q
!
interface FastEthernet0/30
 switchport trunk encapsulation dot1q
!
interface FastEthernet0/31
 switchport trunk encapsulation dot1q
!
interface FastEthernet0/32
 switchport trunk encapsulation dot1q
!
interface FastEthernet0/33
 switchport access vlan 100
!
interface FastEthernet0/34
 switchport access vlan 100
!
interface FastEthernet0/35
 switchport access vlan 100
!
interface FastEthernet0/36
 switchport access vlan 100
!
interface FastEthernet0/37
 switchport access vlan 100
!
interface FastEthernet0/38
 switchport access vlan 100
!
interface FastEthernet0/39
 switchport access vlan 100
!
interface FastEthernet0/40
 switchport access vlan 100
!
interface FastEthernet0/41
!
interface FastEthernet0/42
 switchport access vlan 100
!
interface FastEthernet0/43
 switchport access vlan 100
!
interface FastEthernet0/44
 switchport access vlan 100
!
interface FastEthernet0/45
 switchport access vlan 100
!
interface FastEthernet0/46
 switchport access vlan 100
!
interface FastEthernet0/47
 switchport access vlan 100
!
interface FastEthernet0/48
 switchport access vlan 100
!
interface GigabitEthernet0/1
!
interface GigabitEthernet0/2
!
interface VLAN1
 ip address 10.20.0.254 255.255.255.0
 no ip directed-broadcast
 no ip route-cache
Installing Fuel
Fuel takes over the whole server. Download Fuel 7.0 ISO (torrent), burn it to DVD or copy to USB, Boot, and install it.
Do the update
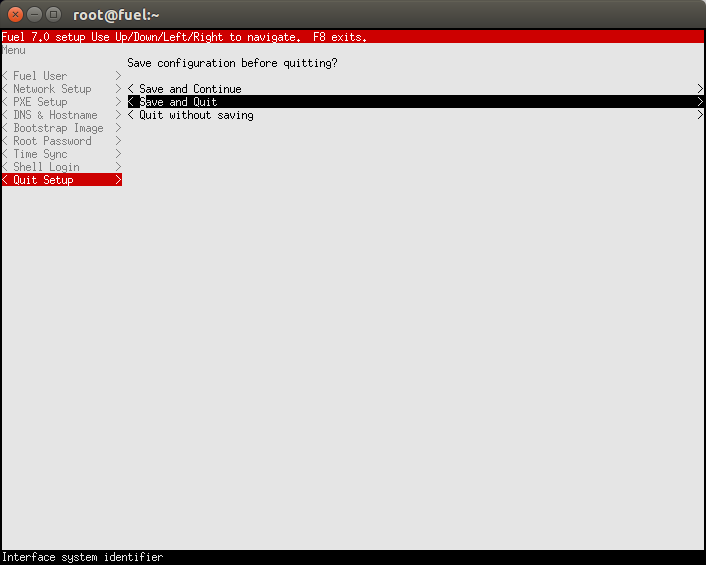
configuring Fuel
enter, down arrow to Quit Setup, enter, right arrow, down arrow to Save and Quit, enter
The root password will also work for all nodes. Fuel sever installs ssh keys
on all installed nodes. From fuel server, you can ssh node-x, i.e.
ssh node-1.There is an alert message that takes you to the flowing url, then to the next url to do an update. We are just going to do the update now.https://docs.mirantis.com/openstack/fuel/fuel-7.0/release-notes.html#maintenance-updates
https://docs.mirantis.com/openstack/fuel/fuel-7.0/maintenance-updates.html#mu-v7-0# ssh root@10.20.0.2use password r00tmedo the following:# dockerctl backup
# yum update
# docker load -i /var/www/nailgun/docker/images/fuel-images.tar
# dockerctl destroy all
# dockerctl start all
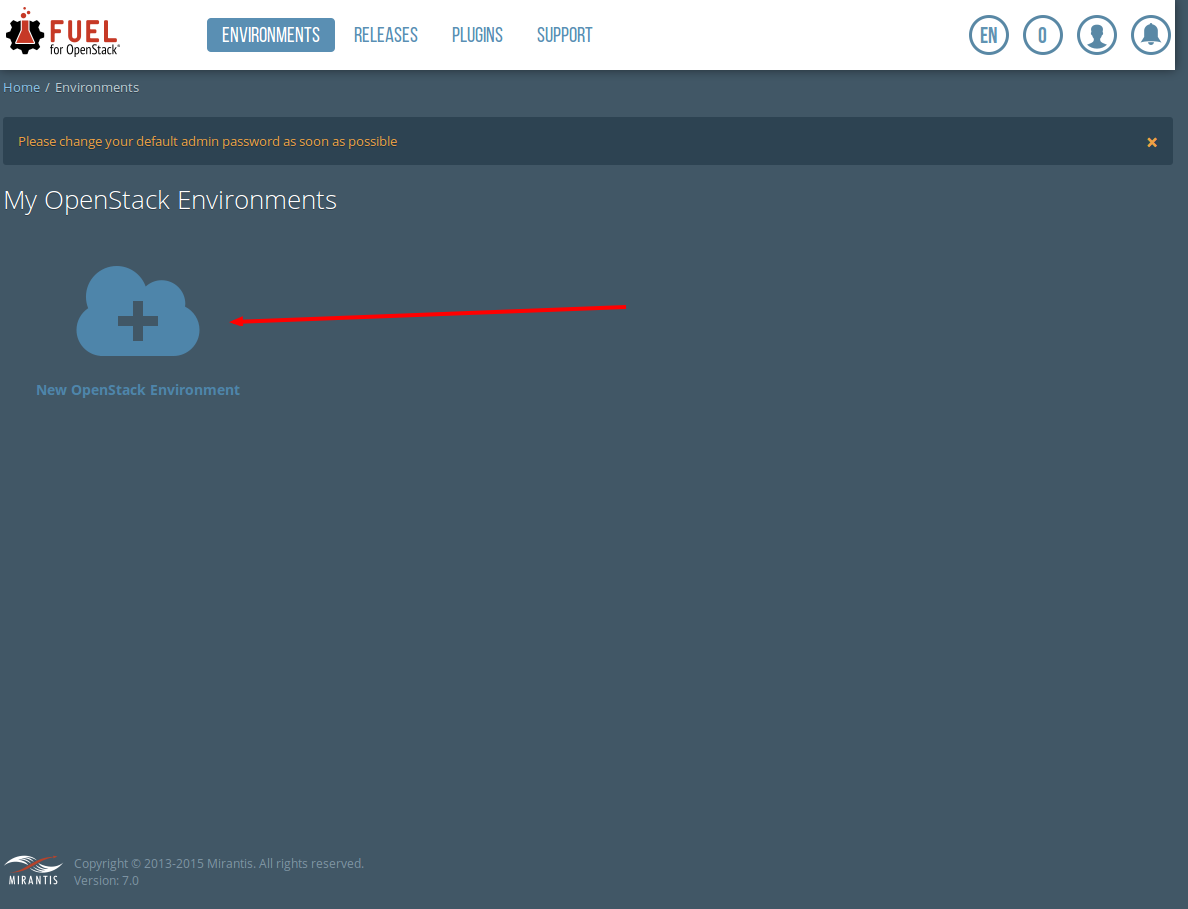
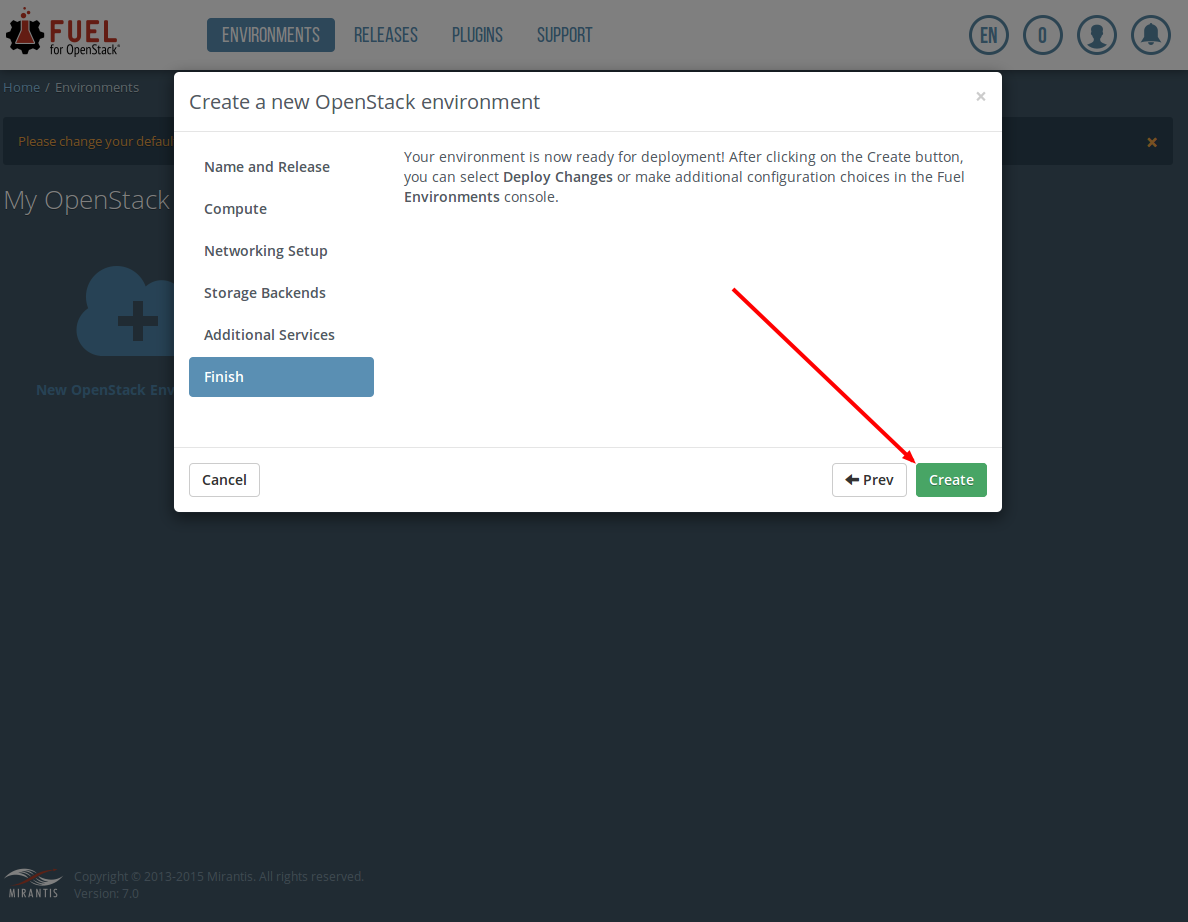
# fuel release --sync-deployment-tasks --dir /etc/puppet/use web browser, go to url http://10.20.0.2we new have an Environment with nothing configured. The Fuel server is ready. Now power on the nodes.Configure Each NodeGo in to the bios by pressing F2 during boot, set eth0 to pxe boot as the first item in boot sequence. Fuel server will remember if a host has already been installed, and tell it to boot off of it's hard drive if so. Reboot server. It will pxe boot. It will take several minutes.
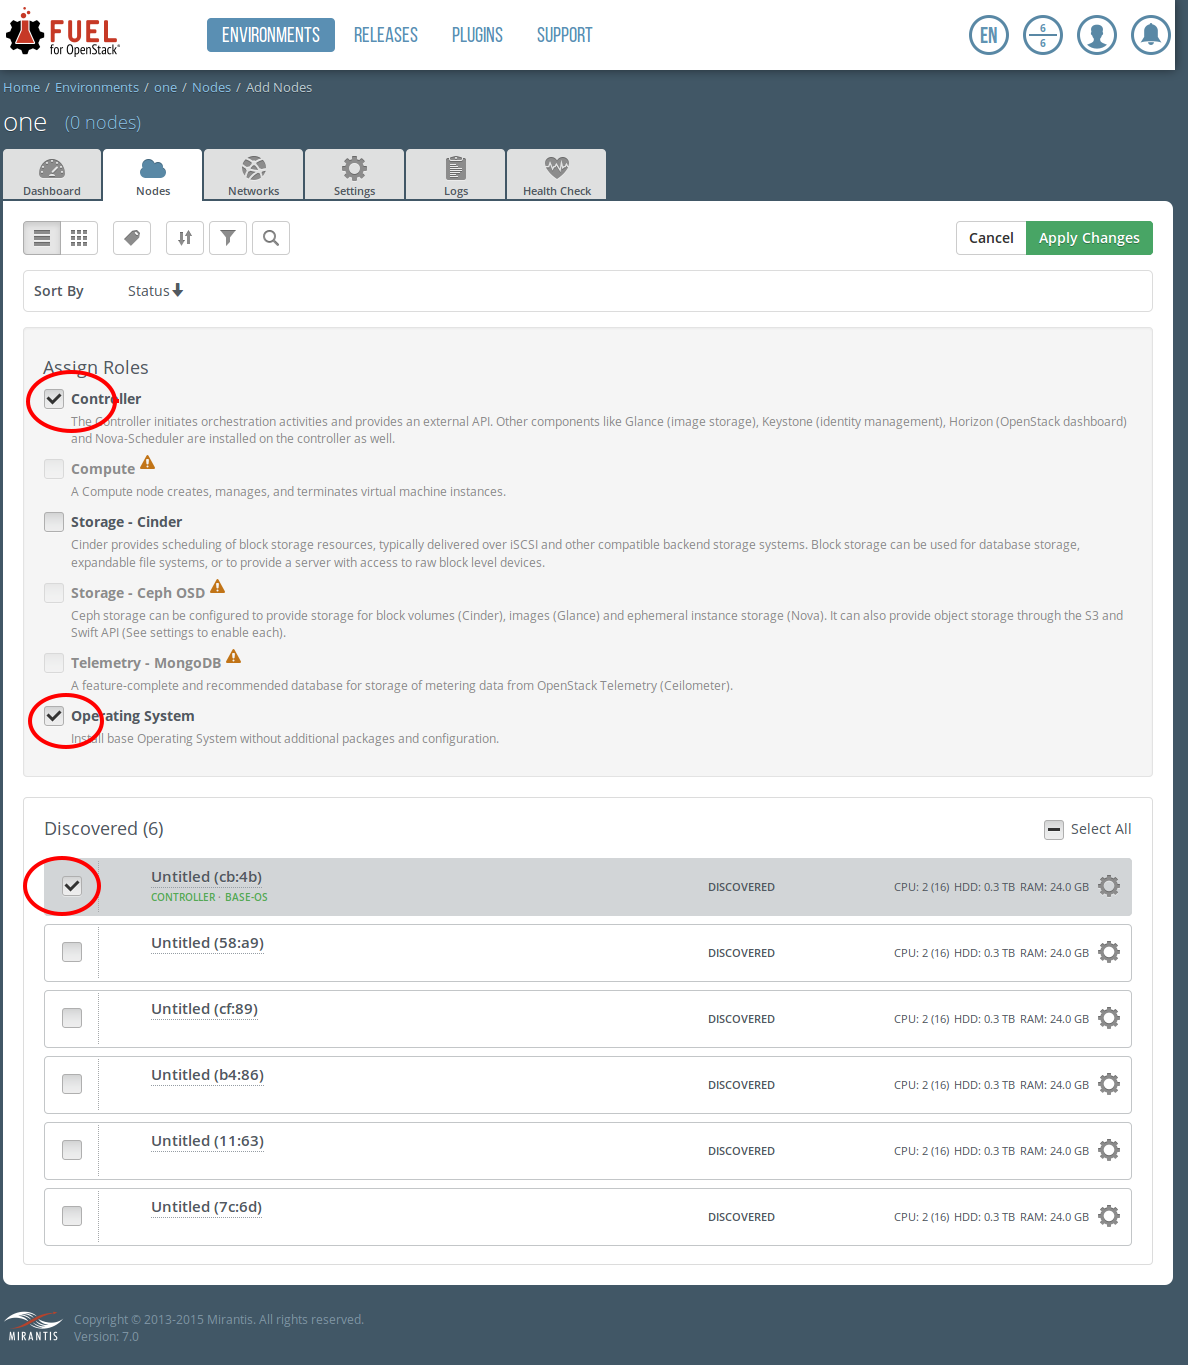
Upper right of this screen shows 6 over a 6. The top number is the number of hosts not allocated, and the bottom number shows total hosts. The bell with Red 6 provides more details.click on Add nodesselect controller, Operating system, one available node, click Apply Changes
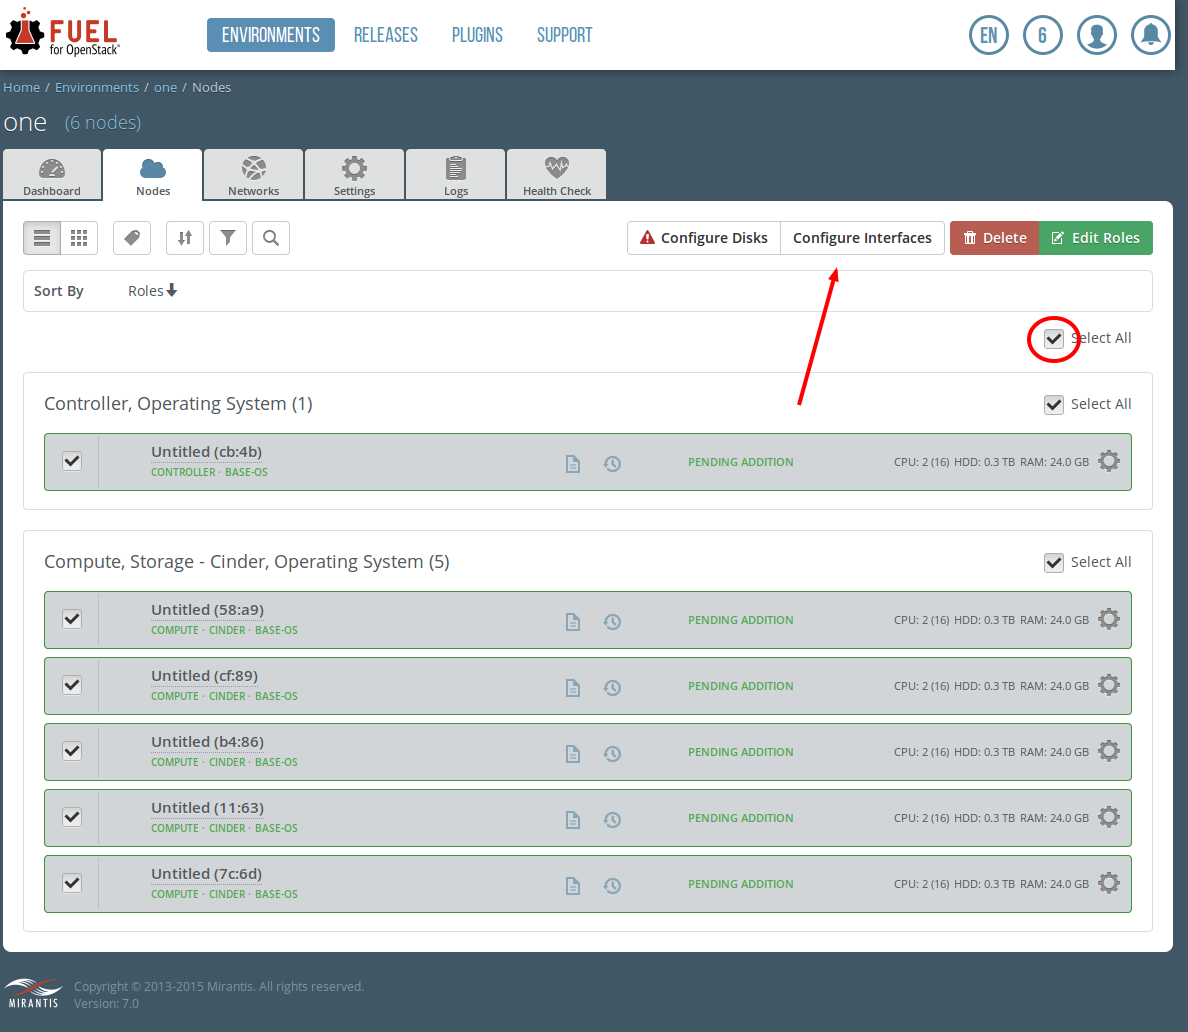
 select Compute, Storage, Operating System, Select All, click Apply Changesselect, Select All, click Configure Interfaces
Left click on Public, Drag and Drop on to eth2
Left click on Storage, Drag and Drop on eth1
Left click on Private, Drag and Drop on eth1
Click on Apply
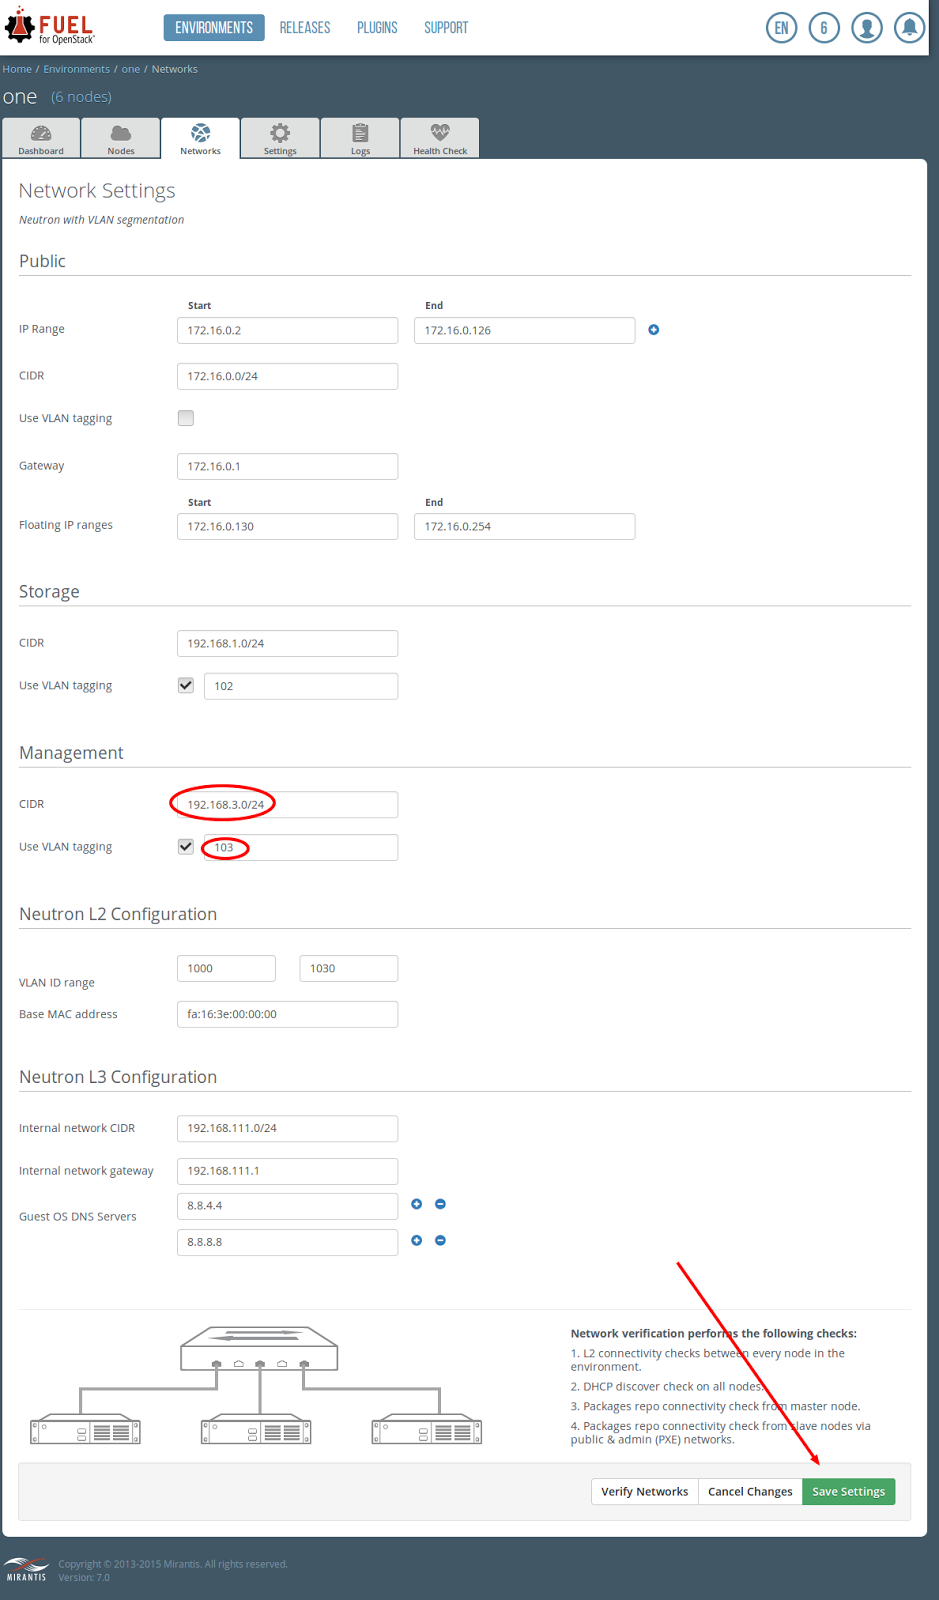
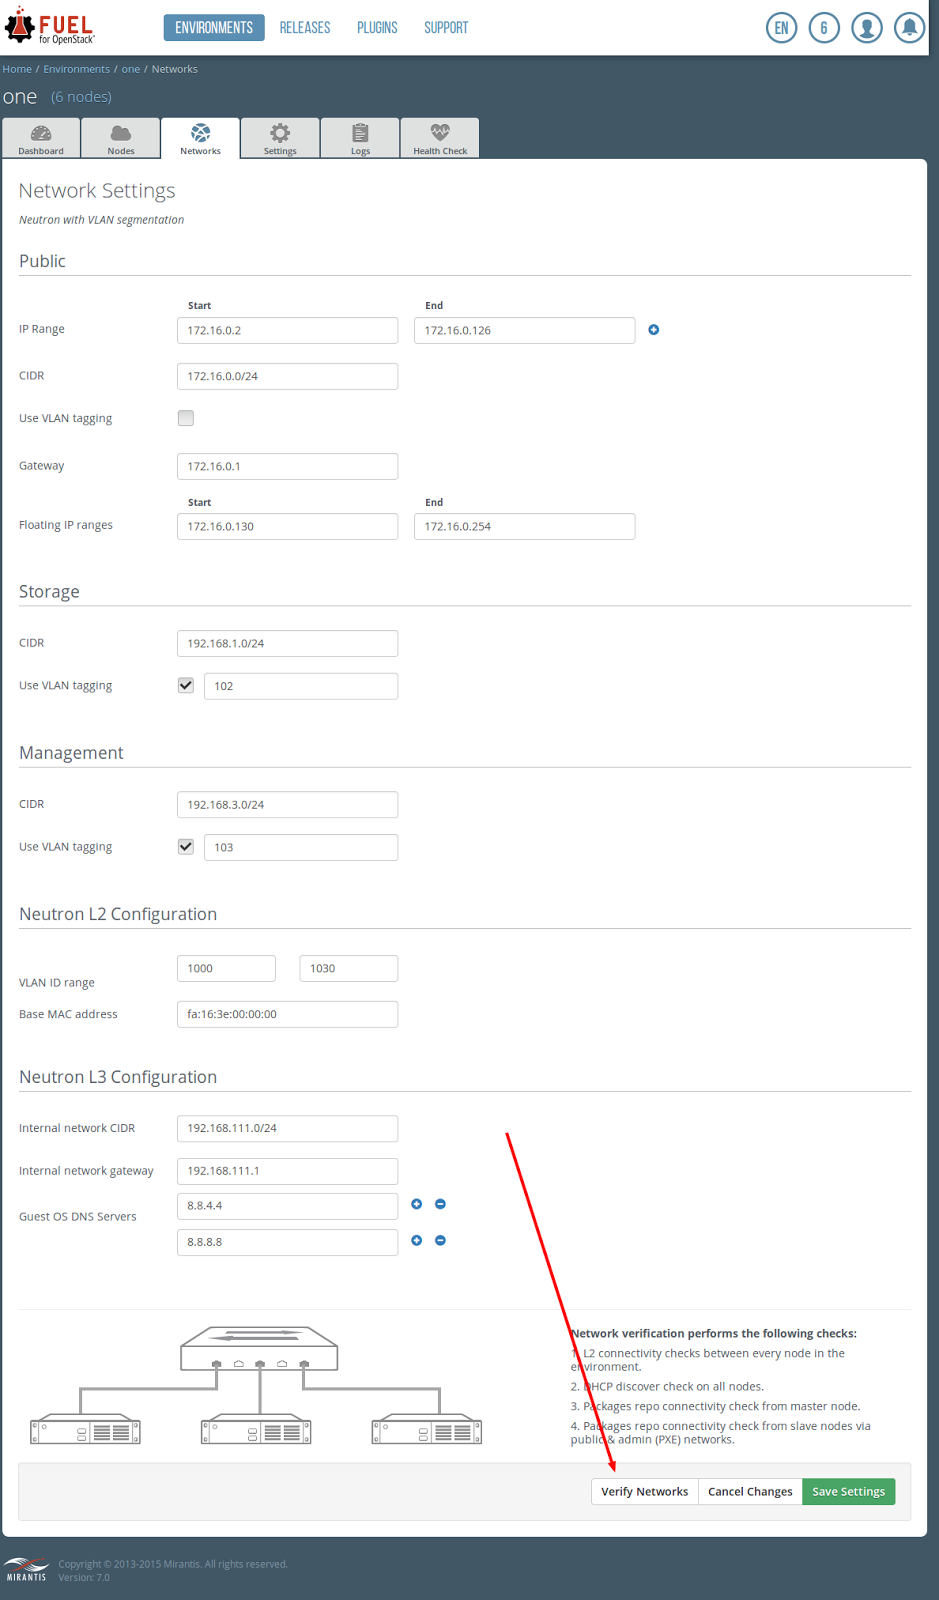
Refresh the pageClick on Networks Tab
Under the Management section,
change CIDR to 192.168.3.0/24
change VLAN tagging to 103
click on Save Settings
click on Verify Networks
on Verification succeed,
click on Save Setting
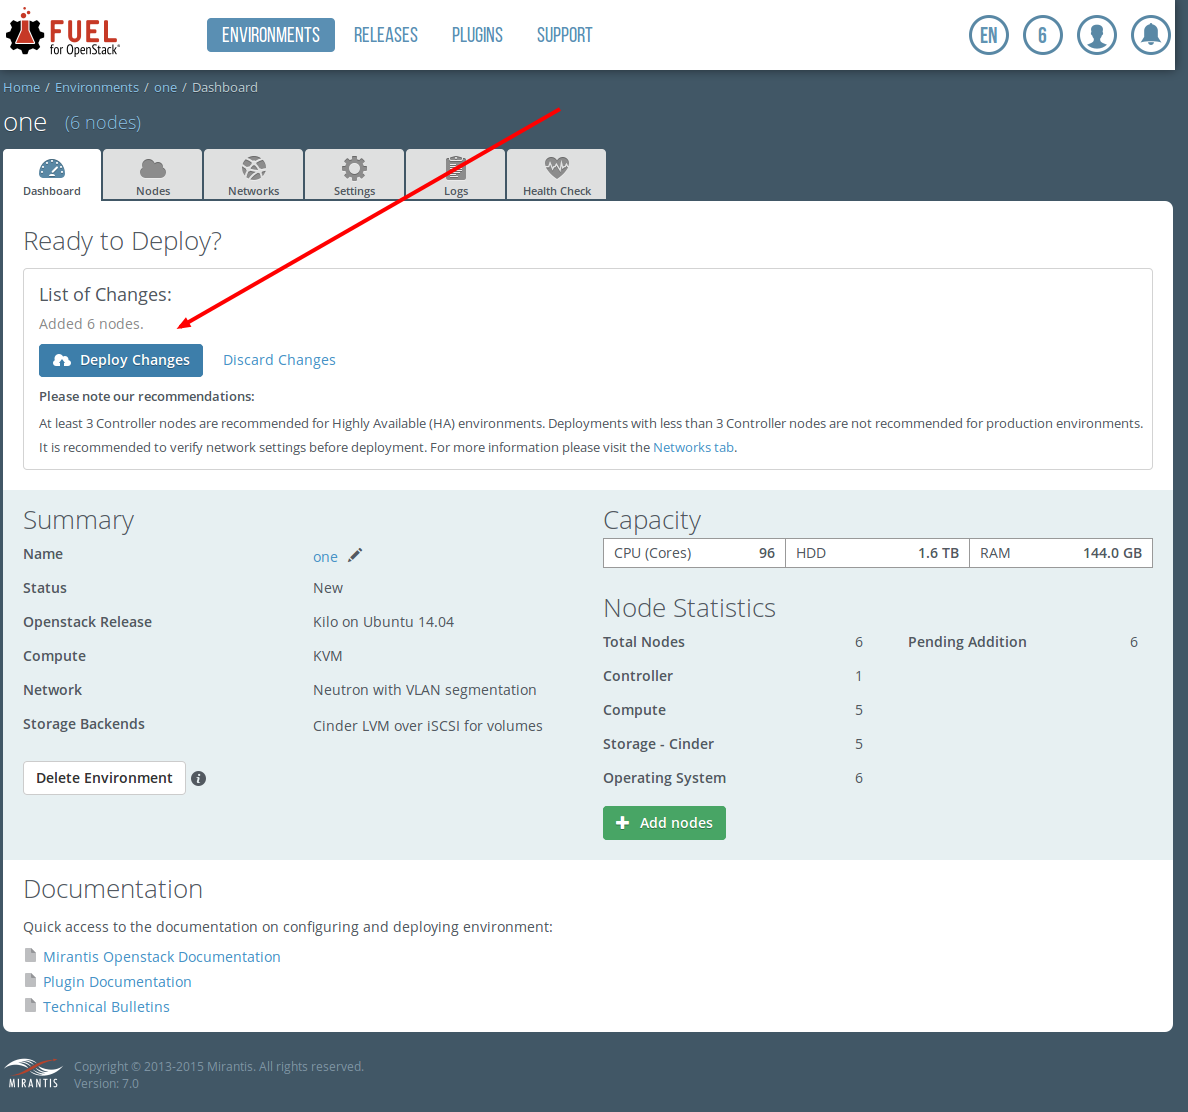
click on the Dashboard tab
click on Deploy Changes
click on Deploy
This install took 1 hr 17 minutes.
click on Proceed to Horizon
Tell me a story
I’ve had the privilege of being in an environment with lots of computers, customers, and home brew software. It is in this context, the term Technical Debit acquires a very deep and concise meaning to me. Openstack has a very noble goal, which is to provide an API that controls compute, storage and networking. It’s a very simple idea. The simplest ideas, when done right, are the most difficult. From this perspective, Openstack is by definition the compute, storage and networking version of Structured Query Language or SQL. SQL is the means in which we learned control data. When we didn’t have to deal with calculating, referencing, or translating data, we got better at managing data. Openstack is doing the same right now for compute, storage, and networking.
I’ve also had the privilege of contracting for many years. When entering a new environment, newbie have been the most successful when someone puts the effort in to introducing them to the ways of the tribe. I’ve since found out that the term tribal knowledge came from military personnel working with indigenous warring fractions. Business is the peace time equivalent of war. A reason Openstack is popular is because it lessons the Technical Debit burden for companies who view management of compute, storage, and networking as a non-core business. Companies that make it their core business to provide compute, storage, and networking services and solutions are now in a life and death proposition of competing with open source. It’s obvious from that perspective why all these big name vendors joined Openstack foundation. They and many new startups are jockeying for key positions in the value chain. This is Nash Equilibrium swirling in front of us right now. Applying the Model View Control pattern to view Openstack Marketplace is a great beer drinking topic, and for attracting women.
In the spirit of open source, I present the above article. A goal for me is to work on a cloud application without vendor lock in. I’ve installed and tried Devstack, RDO, Openstack Ansible, and Kolla. It’s time to see what a physical deployment looks like in comparison.
I had a Dell 1955 chassis with 7 blades. I wanted to redeploy that beast. The combination of needing 240V and space was a challenge. I was OK with fixing DHCP on request. 240V, and the 10 Gauge extension cord tapped in to the stove outlet or dryer outlet; snaking through the home seemed a bit too much. I’ve never met the man, but I bet Steve Jobs would have just done it.
The next consideration was to use the same generation of hardware with separate boxes. I had one Dell 2950. I could scavenge stuff from the Dell 1955 chassis. The litmus test I used to determine obsolescence of computer hardware was for comparing the value of hardware verses the cost of electricity to keep it running for a year. Intuitively, we know that all operators have a similar threshold. This is where Nash is working against me here. All the scrap yards have been sending that stuff to metal recycle bins for a while now.At the end of the first day, I had no success using this generation of hardware. I gave in around noon on the second day. It was apparent that Clovertown was not the path of least resistance. I would have to let go of some green backs and go to Nehalem. I already had two R710. I bought one 3 years ago and one a few months ago. The cost difference is best measured in multipliers. I located a local suppler and decided to get 5 more. The goal was to get Openstack working sooner than later. I had planned for more hardware challenges by over-buying, and arranged a purchase the next day. The seller agreed to meet me at 7 pm at a convenience store. A cash deal took place in the parking lot on a Friday night. I’ve never done that before.
Saturday morning, I stacked the servers up in the spare bedroom. I placed a sign on the door, and now it is my server room. Placement of the nodes was towards the back wall. I left space all the way around the servers. I knew it was going to get hot in that room, also that it was prone to be a cabling mess.
Years before, I was advised by a lawyer I had once hired who said, “if you can explain what you did to a judge, and he doesn’t get a red face, it’s probably OK to do it”. I had visions of standing before a judge and saying, “Yes, the house burnt down because of an electrical fire” , “No, I didn’t check the amperage usage”, and “Yes, I have a degree in engineering.” In my imagination, he would then proceed to say, “Guilty of Negligence! Next!”
I drove to the nearest Home Depot to purchase an amp meter, feeling slightly amazed how much my project was costing me. This project was cutting into my beer budget. I consoled myself by thinking, “beer from the grocery store is just as good as the beer at a pub.”
I hooked up the amp meter then turned on all the servers. I confirmed that the amperage draw was about 80% of the 15 amp breaker feeding that room. My imagination wandered back to my hypothetical court case where I’d say, “I have no reason to believe that 500 pounds of computers, all hooked up to one outlet was a fire hazard, Your Honor.”
I started work on the Fuel server, which is Centos install. This installs itself very well by using Docker to host micro services. This is very cool in my opinion. I left the default 10.20.0.2 on eth0. I assumed it needed access to the Net, so I added a second IP address to the unused port of the fuel server and connected it to the Home Network. I gave that port a default gateway, and removed the default gateway from the other port. As suspected, it phoned home and got more stuff before it completed the install. Upon completion, there was a message on the console with defaults, showing the URL for admin screen, password and root password. Nice! No Google-ing for the details were necessary.
This project was pretty much all hacking. I glanced at the docs. Something in the back of my mind told me that this was not what I wanted to read. This was going to be a project where, if all else fails, read the docs. After getting a few nodes to DHCP boot, I discovered the Network Validate button. Even after NAT Translating 10.20.0.0/24 was confirmed to work, it still failed the validation test. Yes, I did try a few install runs with a failed validation. I can confirm that they ended in failed installs. Fuel wanted the pubic IP address to have Internet Connectivity, duh. The first attempt was obvious. Re-use the Home Network for Public address. I chose a range of IP addresses that looked safe for the existing natives, turned off DHCP, then ran Validate Network, which checked out OK. Let it rip. All was well until the end. Everything just locked up on the network. Not sure what went wrong. A variation of that configuration should work. I decided not to pursue reuse of the Home Network as the Openstack Public network. My Home Network has users with expectations of using DHCP without Fuel making their laptop an Openstack node.
Yes, for the readers who are paying attention, the Fuel network is different than a combined Public and Home Network. The above is funnier!
An option for alternate configurations could be to use a node for one or more of the NAT translations, opposed to one of the Home NAT routers. However, Home NAT routers are the best option for Ghetto Stack. They’re cheap to buy, cheap to operate, and easy to configure. Other deployments will have large variations in existing network construction, but Ghetto Stack is not about building a production oriented network. At this point, it’s time to buy another NAT router. It’s Midnight on Sunday. Off to Walmart I went, and I found a decent router that I’d be OK with taking with me on my next contract gig. A quick check with Google showed it was $10 cheaper at Best Buy. Say it, and it will happen. Price match, Price match, Price match. I saved one more beer at a pub!
Now we have to actually put some thought into networking. There is no getting around doing a custom network configuration. Fuel needed to be on VLAN 1. That wasn’t going to change. Home Network must have separate DHCP. We shouldn’t have two DHCP servers on one network. Competition in market place is good. DHCP Competition on one network segment is bad. Home Network was assigned to VLAN 2. The NAT router providing Public IP address for Openstack will be double NAT. Google it. Some people on the net have postings that say it’s a bad idea. To them I say, Ghetto stack. The Double NAT router will get its public IP address from Home Network via DHCP on VLAN 2. It will configured to to use the 127.16.0.0/24 range with no DHCP. To hook up the double NAT router, plug one of its private Ethernet ports into the switch on a port configured for VLAN 100.
The Fuel Network, 10.20.0.0/24 will remain on NAT translated by the workstation. The only way this network can be effectively used by an administrator is to have the workstation plugged into all the networks. This fits with a minimal keep-it-simple solution. That is what a minimal fuel network looks like.
An alternative would be to translate an entire class B space. Use a router to make different subnets that can be seen by each other. That is another project for another day.The end result is the Network Diagram at the beginning of this post. On most recent runs, I removed the second Ethernet connection on the fuel host that is connected to the Home Network. This is the initial boot strap internet connection for the Fuel server before the rest of the network was created. Be sure that Fuel network has public translations. A completely default install of Fuel, and one IP range change for an environment within Fuel will let Fuel fully install Openstack.
This install of Openstack is still not fully functional. That just means Openstack consulting and support will stay in demand for the foreseeable future. At first glance, this may seem really bad. This is no different than the early days of PC. It took many attempts at installing any operating system on a system. Sometimes it took driver downloads or even parts replaced with different brands. This is the normal open systems cost of technical debit shared with whole community. I’m reminded of a buddy who figured out that his permutation of hardware and software worked only if he booted his PC with the CD Rom in the open position, and closed it during the boot process. I never did ask how long he took to figure that out.


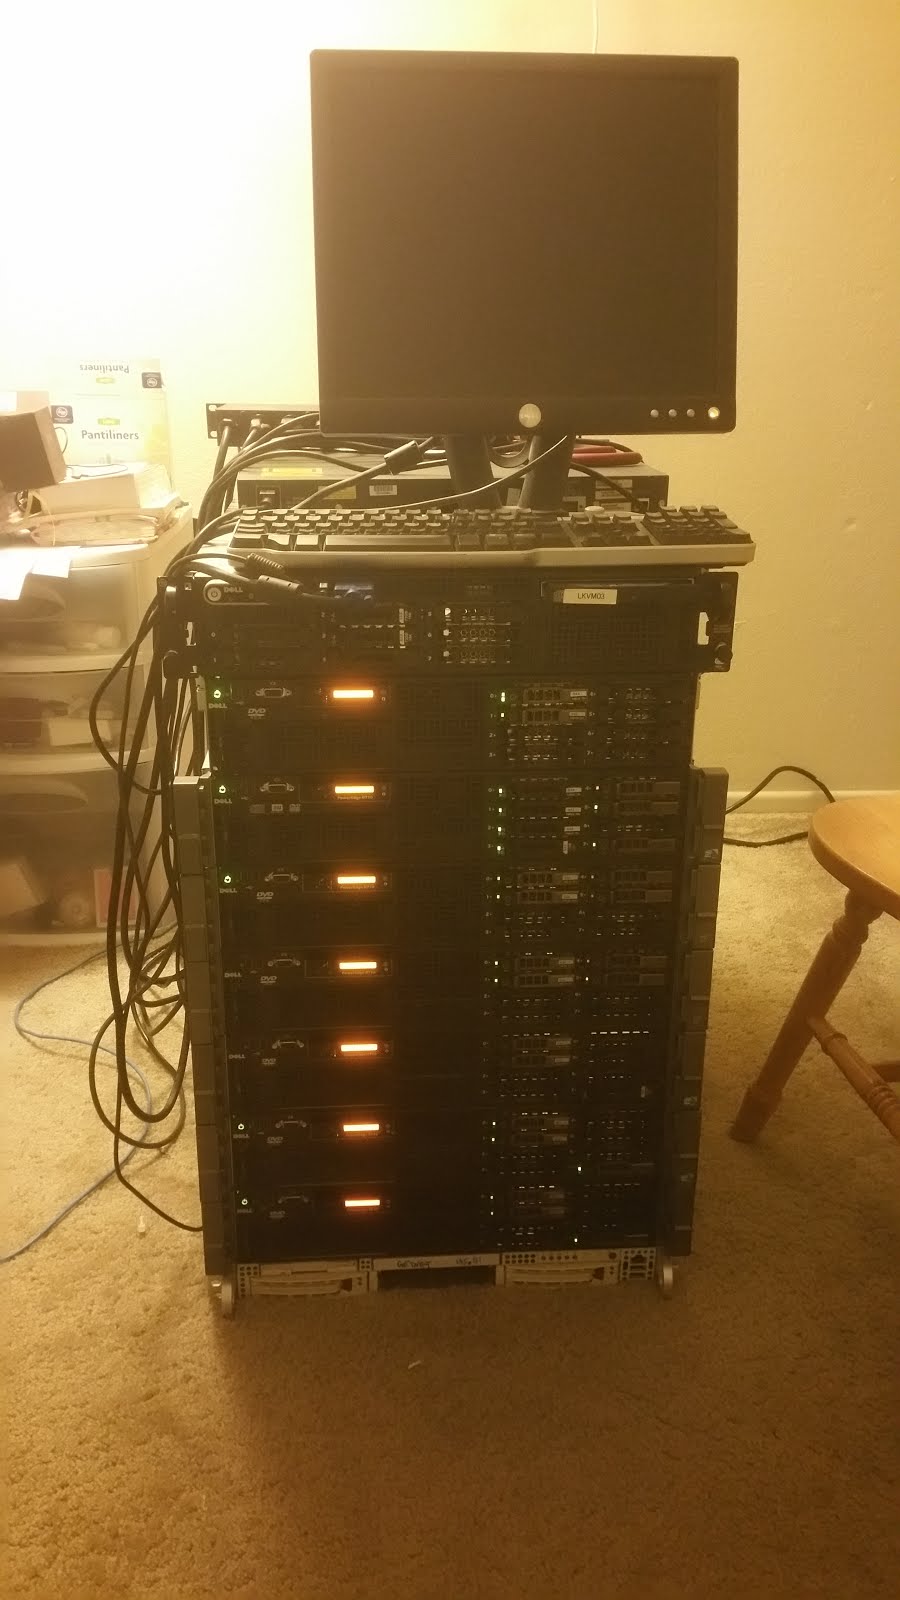 |
| Ghetto Stack |
posted March 3, 2016